|
I have a giant pile of bookmarks to share, but have a feeling that most of us are still a bit overwhelmed as we adjust to a new year with more changes. So, what would be useful right now? A little bit of YouTube, a few Google Slides Tips and some more on the new features in Jamboard. I also wanted to share EdTechTeacher's new RemoteLearning Guidebook.
YouTube Tips
Many teachers are creating and posting videos to YouTube. A couple things about YouTube that I find useful are being able to embed a video without all the ads and nasty stuff. It was a bit disconcerting earlier in the week when safeyoutube was hacked and teachers around the country found links to inappropriate videos instead of the edu links expected. This short video from Brigid Duncan will show you how to get rid of the junk. Essentially: put_popup in between the word watch and the question mark in the url.
One other site that I find useful gives me a way to set the start and end time for a video I want to share with students. Yes, you can poke around in the url and set the times, but this is easier. Just go to YouTube StartEnd.com and input your times and it pops out the correct url for you.
Richard Byrne also put out a short video this week about ways to show clean videos. Math Reps
Jon Corippo has a great collection of Eduprotocols Math Reps that you may want to check out. If you haven't started using Wakelets for bookmarking and making curated collections, it's time to check it out! Easy to use and at least for me- I don't get lost down the rabbit hole like I do on Pinterest.
Google Slides
I love using Google Slides,as they are incredibly versatile. Our district purchased Pear Deck, so that we can use so many of those interactive features as well.
Jamboard
Back in July Kris Szajner wrote an excellent guest post on Matt Miller's blog and shared some great templates- all ready to use in Jamboard. Here's the post. Check out the templates!
Richard Byrne has a nice short video on using Jamboard in Google Classroom
Tom Mullaney just put out a series of real short videos to help you use the new features.
Want to get fancy and do some app smashing? Check out Greg's video.
0 Comments
One of the questions about chromebooks in the classroom that I often hear is "How do I create/edit video on a chromebook?" The answer varies. Are you trying to edit a video that you created elsewhere? Or are you trying to create a video? Or are you trying to add audio to a slide show? Or? Or?... One tool that is often overlooked is the creator tool on YouTube. The C4L blog (a student led support site) recently posted about using these tools. You can check out their work here. Of course you can do a quick search on youtube and find tons of videos to show you how to edit video on youtube. Below is just one example. Remember you can edit a creative commons video, upload and edit your own, upload images and add a sound track and so much more. There are lots of tools out there to create videos on chromebooks. Richard Byrne recently published a blog post featuring 12 ways to create videos on chromebooks! My absolute favorite for ease of use is Adobe Spark. For those of you who are Adobe fans, you know that Adobe had 3 separate tools which are now kind of one suite. Adobe Spark can help you create quick and easy videos, Adobe Page can give you a quick and easy web page and Adobe Post is a quick and easy way to create beautiful images for social media. In schools- the students need to be 13+ to create accounts. I really wish they would add some sort of teacher dashboard, even if you had to pay a small annual fee. Spark is easy to use and I have seen it used successfully and independently by grade 1 students to give beautiful results.
Another way to create video on chromebooks is with WeVideo. WeVideo has been around for quite a while and is a pretty robust platform for a web based editor. Below is the quick intro, but they have a whole library of video tutorials on YouTube. Depending on your bandwidth, the upload can be a little laggy and can be problematic when you have a class of students trying to finish up, upload and go on the next class at the same time. Screenshots and Screencasting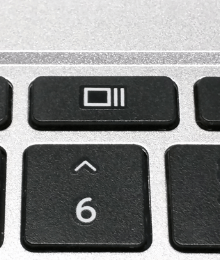 One other video/screen sharing question I get is how do I (1) take a screenshot, (2) make a screencast. The answer to #1... Use the ctrl key and the split window key to save a full screenshot to your files. Use Ctrl+Shift+the split window key to save a partial screenshot. Remember that files saved to your downloads folder are not permanent and especially on school chromebooks may disappear. If you need the file, save it to your own Google Drive. You can also use Awesome Screenshot extension which offers additional annotation, blurring, etc. Screencasts can be accomplished in quite a few different ways. To be honest, I use camtasia and snagit on my home computer. TechSmith had a snagit extension which has been discontinued. The best screencast capturing extensions are Nimbus and Capture, Explain, Send. Nimbus is a robust extension, easy to use and does just about anything you's like. Jason Savard's Capture claims to be the simplest- with no crazy permissions. I used to use screencastify, which also has a lot of features, but is a bit more complicated to get started with. So, what do you need a video for? To record your screen, to teach a lesson or to get quick feedback? Don't forget about recap- a great way to collect individual videos from students for quick feedback and more.  Tuesday Tips from #GoogleEdu
This was a new one for me, hat tip to Kasey Bell of Shake-up Learning, but #GoogleEdu has a series of Tuesday Tips now. These are for Forms, Classroom and Google Expeditions at the moment, and come as a slide deck- see links below. I couldn't find any other source for these tips, so follow #GoogleEdu on Twitter to stay informed.
MAP Test Correlation Tool
I wrote a while back about the MAP test correlation tool being used by KIPP schools on the west coast, referencing this site and spreadsheets. This worked, but was pretty clunky and labor intensive to set up. Each student had a color coded sheet, which related to their scores on the MAP test, and they also had their own copy of a color coded Kahn Academy list of skills to practice and check off. A lot of flipping back and forth. Lo and behold the NWEA folks have come out with a new tool - a prototype- to do the same thing. This is the tool. It is easy to use; I tried it today with 3rd graders. Here's the instruction page for teachers. Students in grade 3, 5 and 6 are all set up with their most recent MAP scores. There is also a new icon on the hes.symbaloo page which matches the little icon on the top left of this paragraph. Don't ditch the other spreadsheets since this is a prototype and may disappear.
The other cool thing about MAP tests, and I don't say positive things about tests lightly, is the new next gen student profile section with breakouts for instructional ideas. I went to a webinar last week on it and was honestly impressed with the ways to use the data. A bit time-labor intensive, but when you have time- check out the next-gen student profile section. This is a link to the recorded version of “Student Profile Report – Instructional Module.” Below is an example of these reports. You can go through the step by step and see some short videos here. 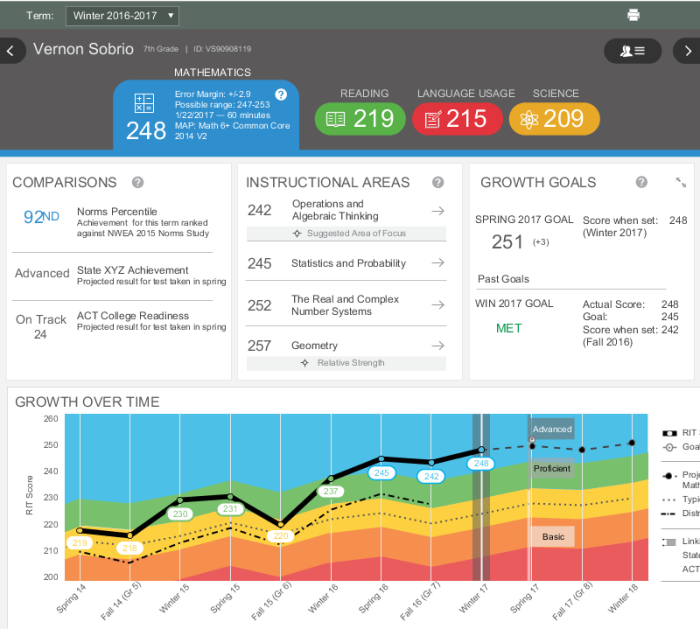
Cleaner YouTube
Most of us have had that magical moment in the classroom when the YouTube video we plan to show now has nasty ads, or obscene comments- which weren't there when we previewed it.
There are lots of ways to get around that sinking feeling, but they do take a bit of planning. Here's a symbaloo with some ideas for you. I will also pop this onto the HES Teachers symbaloo for those of you who use that as a start page.
So, what are these? The top row- are all places that you can paste the YouTube url and get a clean version to show your class. The row on the right- all ways that you can download the video and put it on your drive. You need to be aware that the TOS for YouTube asks that you do not download and view. The way YouTube makes money is through ads and clicks- not from folks downloading.
The row on the bottom is kind of a mish mash. You can chop out pieces of videos to show. Perhaps you only want the middle 3 minutes of a 20 minutes video... adjust it. I also added a couple of chrome extensions that you can use to hide comments or ads. One very easy workaround is to insert the YouTube video you want to show into a Google Slide. No ads, no comments- just the video, unless you click thru to the YouTube site. |
AuthorMaureen Tumenas 

Archives
June 2021
|
 RSS Feed